I have been unhappy about my eyebrows for some time. After over-plucking them in the 90’s (thanks Madonna in your Erotica period) they had been left sparse and gappy and did not really ‘fit’ my face anymore. I had tried different topical beauty treatments and make-up products and had got to the point where I would want to pencil them in even if I wasn’t wearing make-up that day.
I knew a bit about Microblading but also was fearful of how ‘permanent’ it was. I didn’t like my brows but also didn’t want two thick caterpillars tattooed on me!!!
After hearing great things and seeing examples of her work, I went and visited Sophia Coomber from Beauty and Bloom, a beautician service local to where I live where she told me to forget about Microblading – the future is Nanoblading!
Nanoblading is a new brow treatment that uses ultra-sharp nano needles that can actually mimic the diameter and dimension of a real hair in the skin, It is a form of cosmetic tattooing but it’s not as deep as a conventional tattoo, as you are only going through the top layer of the skin into the upper dermis. Put simply, it’s Microblading but with super fine, flexible needles. The technique means you can create a more natural looking brow shape because the beautician can apply more accurate pressure and the pigment that is used is finer too.
First session – consultation and patch test
After a patch test to ensure you aren’t allergic to the pigment or the numbing cream, you have a consultation to discuss the perfect eyebrow shape and colour for you. Sophia is absolutely lovely and immediately put me at my ease. She explained the procedure and well as how she was trained and the attention to detail she has. She warned me it would hurt a bit and as she had to do a tiny test cut to check I wasn’t allergic to the pigment I discovered she is truthful too! It does indeed hurt!
Second session – Nanoblading procedure
A week later I was back and ready to go for it! I was a little nervous but Sophia made sure I felt very comfortable and assured me we could take breaks if it got too uncomfortable. After applying some numbing cream, your chosen eyebrow shape is drawn on top of your brows so you can check it, before the treatment starts.
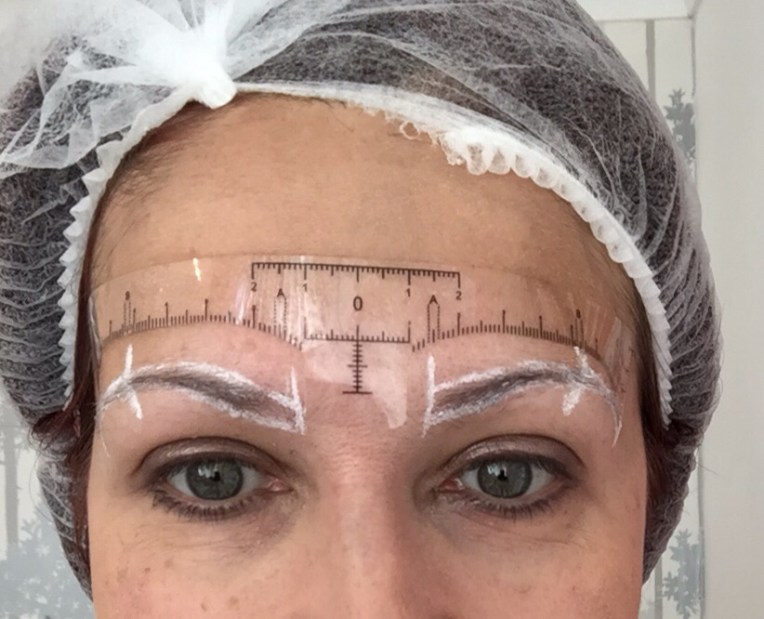
I’ve got to be honest the numbing cream doesn’t really make that much difference – Nanoblading hurts! Obviously this is the case wherever you go as tiny, light cuts are being made that feel like deep scratches but hey, no pain no gain! Sophia has a lovely calm and comfortable treatment room and you can have music playing which is a nice distraction. Oh and chatting, that helps too! The procedure itself takes between 1.5 and 2 hours depending on the amount of brow you need creating and at points I found it quite hard and my eyes did water quite a bit but overall it was manageable. You know you are going to get something you really want and I would say just be brave and focus on the end result.
Before and after –
After the procedure you can see the effect is quite significant but also very natural. The colour looks a little dark at first but Sophia assured me it would fade over the next two weeks, which it did.
The aftercare is much like a tattoo – you clean the area morning and night with cooled boiled water and add a skin healing cream straight after. Sophia provided everything I needed right down to the cotton wool pads for the aftercare which I thought was a lovely touch.

I didn’t feel any real pain or discomfort afterwards and by about day 10 they only felt a little itchy as they were still healing but that didn’t last long. You are also advised to keep out of the sun, to not use certain beauty products and not get your face too wet for the first week or so. The better you look after them the longer they will last before needing retouching.
You’ll need two sessions, the second about four to six weeks after the first, to achieve the finished look, but you’ll still be able to leave the first appointment with beautifully shaped brows that don’t look half-done.
Third session – perfecting treatment –
So five weeks later I was back! Having lived with my new brows for well over a month I felt they could be a little bit thicker and longer. Sophia added some tiny drawn hairs to the arch and ends and this procedure was much easier. I think its definitely best to err on the side of caution during your first session though as you can always add a little more but you cant remove any!

Straight afterwards –
This is just after my perfecting treatment. Again my brows are quite dark but slightly stronger looking which is what I wanted. And no thick caterpillars in sight!!!

2 weeks later…
A few weeks later I have stopped cleaning them and they have faded slightly as expected. I am so pleased – I am not wearing any eyebrow make-up in this photo of any kind and now I don’t need too. Even close up you cannot tell they are not real hairs – it really is amazing!

Overall progress – before, after first procedure and after perfecting treatment –

I think this series of close-ups speaks for itself. The initial treatment takes about two hours, followed up with a perfecting session that lasts about an hour. Everyone’s skin is different, but generally the pigment lasts in the skin for 12-18 months without retouches.
Sophia’s treatment costs £250 for the three sessions. She covers the East Kent and Redhill, Surrey area and can be booked here. I thoroughly recommend her.
For those in other areas, to find a qualified Nanoblading beautician look for one certified by a recognised training provider and one that is fully insured. Plus request to see pictures of other work that they have done or look on their social media before booking in for the treatment. Make sure they are only using their own original photos and look for reviews and testimonials.
I am so glad I finally plucked up the courage to get this procedure done. I feel so much more confident and attractive. Yes, it hurt a bit being done but that feeling of confidence is just priceless!


You must be logged in to post a comment.